Del:
XPreferences, Tab 1 [ Setup ] |
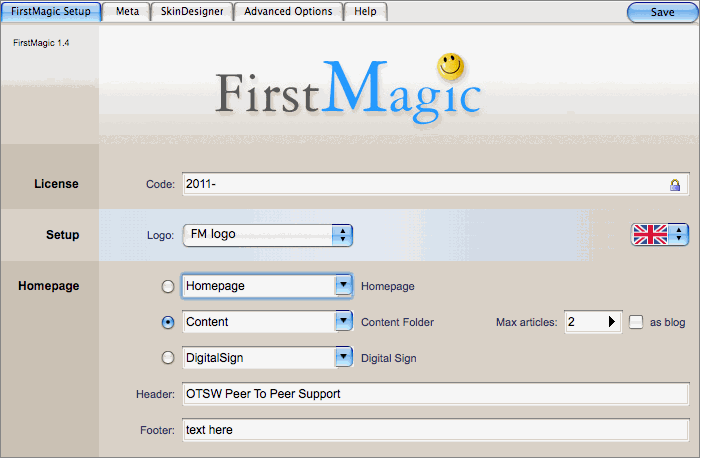 License: enter a valid code here to activate the product. This will remove the FirstMagic badge, and also unlocks ithe Sign clock. License: enter a valid code here to activate the product. This will remove the FirstMagic badge, and also unlocks ithe Sign clock.Logo: choose a logo mode: • No Logo: removes the website logo • FM Logo: outputs the FirstMagic logo • Logo URL: Opens a field to link to your own logo • Icon: opens the Icon Picker [for FC Communities Skins] Language [flag icon]: select your primary publishing language here. Select the last item in this dropdown [the ? sign ] if you want to change the language terms, and an Edit button will appear to open an editable list of all the labels your website is using. NOTE: the difference between "EN" and "EN/US" is that address formats will change on metadata output. Homepage: select a display mode for the website Homepage. • Homepage: the Homepage becomes a splash screen, • Content: the Homepage will list all documents in the Content Container with thumbnails and an exerpt. The Homepage Document will be pinned to the top if the Homepage Field is filled in. • DigitalSign: the Homepage becomes the default Digital Sign Calendar. • Max Articles: limits the number of articles to be displayed from the Content Container. If you put an asterisk * before the value, this list will scroll. • As Blog: show all articles in the list in their entirety instead of abbreviating them. [Black arrow]: click the arrow to access fields for more detailed control - here, you can limit the number of visible items in sidebars and other lists if necessary. Header: a short text you can output in the header of all pages. Footer: a short text you can output in the footer of all pages. |
Preferences, Tab 2 [ Metadata ] |
Metadata: Basic Options |
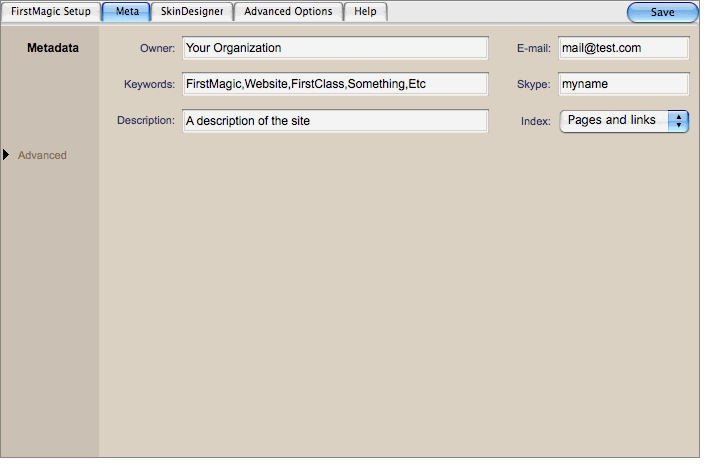 Owner: becomes the title of all metainformation you choose to publish (like Google search results, the Sidebar Contact Box, the header of printerfriendly pages, etc). Ideally, the name of yourself or your organization. Owner: becomes the title of all metainformation you choose to publish (like Google search results, the Sidebar Contact Box, the header of printerfriendly pages, etc). Ideally, the name of yourself or your organization.E-mail: the e-mail alias of the conference you will use to receive messages posted on public forms as well as any messages created from the "Webmaster" link in the footer of all your web pages. Keywords: descriptive keywords about your website for robot indexing (by Google, Bing, Facebook, etc). You can add multiple keywords by comma-separating them. You can override these on a page-per page basis, by inserting custom keywords in the corresponding field in each document/webpage. Skype: Insert a Skype ID here, and a status-aware Call Button will appear in the Sidebar Contact Box. Description: a short description of your website for robot indexing (by Google, Bing, Facebook, etc). As with Keywords, this sentence can be overridden on individual pages. Index: select what search engines will be allowed to discover about your website. "Pages and Links" is recommended. Advanced: click the arrow to access more metadata fields. |
Metadata: Advanced Options |
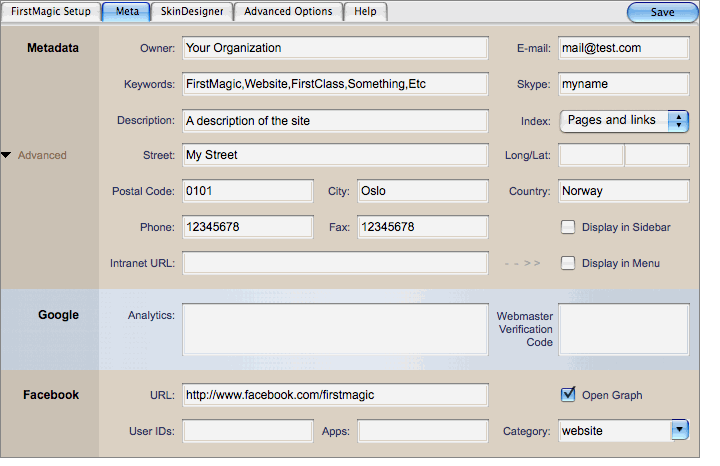 Street Address | Phone | Postal Code | Fax | City | Country: additional meta fields that will be published to FaceBook, your Sidebar Contact Box, and the header of all printer-friendly pages. Street Address | Phone | Postal Code | Fax | City | Country: additional meta fields that will be published to FaceBook, your Sidebar Contact Box, and the header of all printer-friendly pages.Longitude, Latitude: geolocation functions for use with Facebook [ Open Graph ]. It will also generate a clickable Google Map of this location in your Sidebar if "Display in Sidebar" is checked. Display in Sidebar: will create a contact box in your sidebar with all your contact information nicely formatted. Intranet URL: if you fill in the domain name of your intranet here, the URL /login will reroute visitors to your Intranet Login page instead of opening a login dialog for the website. - - > > Display in Menu: if the Intranet field is filled in, checking this box will add a Login link to the Top Menu. Analytics: if you register for Google Analytics, Google gives you a javascript snippet to insert into your page headers. Paste it into this field, and FirstMagic will stamp it [invisibly] on all your web pages. Webmaster Verification Code: if you establish a Webmaster Account with Google, they ask for verification that you are the site owner, and you get a code to insert in your Index file. Paste it into this field instead. Facebook URL: a link to your Facebook Page. This field is used by any Widgets that needs it, and if filled in, will also be outputted in your Sidebar with your other address data if "Display in Sidebar" is checked. Facebook User IDs, App IDs: [for use with Open Graph]: add Facebook User IDs and/or Application IDs to connect your site with Facebook. You can add several IDs by comma-separating them. This will make Facebook aware of your website, and allows you to build or add Facebook functionality into your web pages. This will also make you a moderator over comments your visitors posts on your site via the built-in Facebook Commenting function - which gives you the ability to edit or delete such postings. Open Graph: this checkbox turns Open Graph On/Off, and the Category Selector below lets you identify your type of website to the network. You can insert a custom tag here (for example an ISBN number) if you follow the convention outlined under Object Types on this page: http://developers.facebook.com/docs/opengraph/. NOTE: the Category Selector must be active for Open Graph to work. |
Preferences, Tab 3 [ SkinDesigner ] |
The SkinDesigner has two columns: Styles and Layout Options. Styles determines the overall design while Layout Options determines the positioning of elements. |
SkinDesigner: Layout Options |
Sidebar [ Left | Right | None ] The position of the Sidebar, or no Sidebar. Will display anything that resides in the Sidebar Container [documents in their entirety, containers as lists] Logo [ Left | Right | Center ] The position of the Logo if it exists Menu [Dropdown | Custom | Plain | Off ]
Split Sign: the width of the area in Digital Signs that is available to Sidebar Objects [Documents and Widgets in the Today/Tasks List ] Sign Clock: Time format, or no clock |
SkinDesigner: Styles - general |
The Style column has three panels, allowing for different ways of designing the website. These have one detail in common - the styling preferences: The dropdown Selector is context-sensitive, and changes depending on what Skin category is chosen [ FirstMagic Skin | FC Communities Skin | Designer ]: it lets you select among designs from the active Category. Style Widgets: if checked, will format all Widgets with a common "dark glass" theme. This will make your pages look a lot tidier if you use a large number of Widgets. If unchecked, the Widgets are styled according to the active Skin. Menu Icons: if checked, will add FirstClass Icons to the dropdown Menu - giving a graphical indication of what kind of object each link represents. Freestyle | Style Typography/Layout | Style layout:
|
SkinDesigner: FirstMagic Skins |
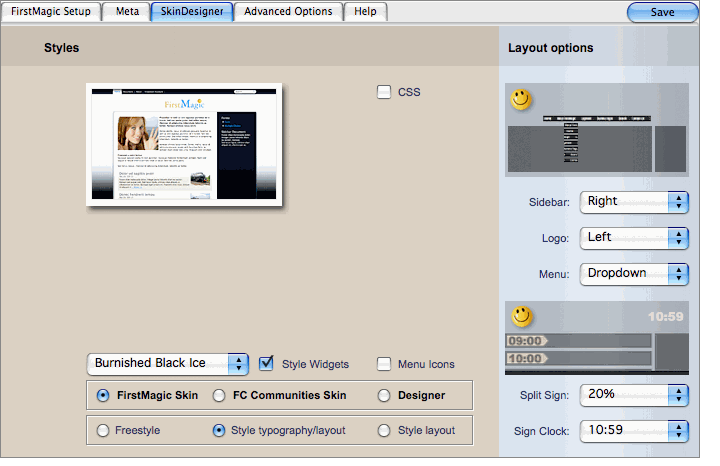 By selecting FirstMagic Skin in the Category field, you can choose between a series of pre-made FirstMagic layouts. By selecting FirstMagic Skin in the Category field, you can choose between a series of pre-made FirstMagic layouts.To the right of the Skin preview is a checkbox labelled "CSS"; checking it will add a writable field below the preview. This field is for adding CSS code that will allow you to tweak the active Skin. Anything you write here will override what´s built-in. NOTE: The CSS Modifier will override all three stylesheets - Website, Digital Signs and Mobile Interface CSS. To distinguish between them, you can prefix your CSS declarations with: body.website .class | #id | span { ... } body.mobilewebsite .class | #id | span { ... } body.digitalsign .class | #id | span { ... } |
SkinDesigner: OTSW [ FirstClass Communities ] Skins |
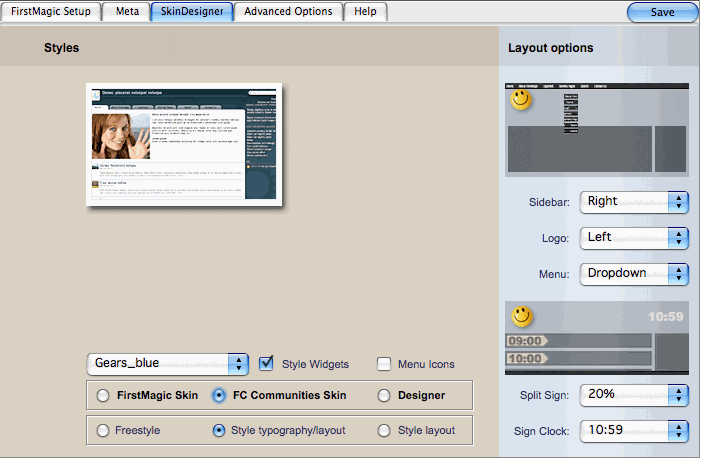 By selecting FC Communities Skin in the Category field, you can choose any FirstClass Communities Skin for the website instead of a FirstMagic Skin. By selecting FC Communities Skin in the Category field, you can choose any FirstClass Communities Skin for the website instead of a FirstMagic Skin.FCC Skins has some peculiarities FirstMagic Skins do not: since they aren´t FirstMagic Skins, the Layout Options panel does not govern logo or Sidebar positions - these are locked to the appearance of the server´s FirstClass Communities design. That means there is no CSS Modifier here, either. NOTE: FCC Skins will only be available if FirstClass Communities is in fact installed on the server. |
SkinDesigner: Designer |
By selecting Designer in the Category field, you can design your own layout instead of using a built-in Skin. The Designer Category has five Modes:
|
SkinDesigner: CustomCSS |
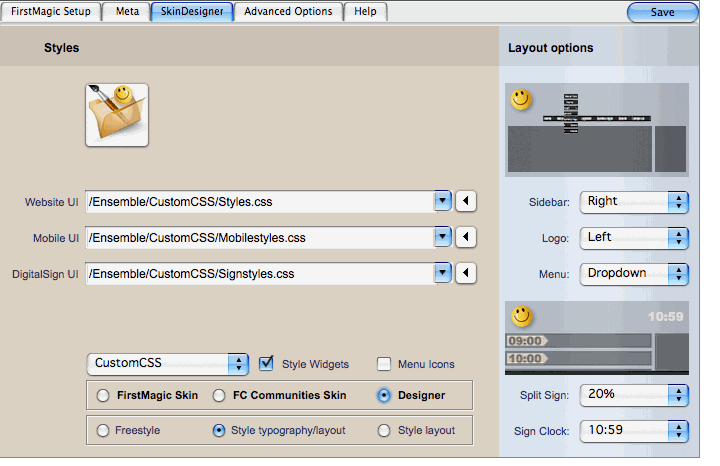 If you select CustomCSS, Edit buttons will appear. Click them to open the CustomCSS stylesheets. You can also find them by going to Ensemble > CustomCSS. If you select CustomCSS, Edit buttons will appear. Click them to open the CustomCSS stylesheets. You can also find them by going to Ensemble > CustomCSS.The fields to the left of the buttons are the URLs to the stylesheets; by default, they go to the style documents in the CustomCSS folder [the ones the buttons will open]. The CustomCSS folder The CustomCSS folder in Ensemble is where you can code your Skin from scratch if you want more control than the Presets will offer. It comes with a thoroughly commented CSS starter kit, and is ready for use. There is no practical limitations to what kind of design you could produce from them. • Styles.css is the website Skin • Signstyles.css is the Digital Signs Skin • Mobilestyles.css is the Mobile Interface Skin. NOTE: You don´t have to use the CustomCSS folder in FirstMagic. By supplying different URLs in these fields, your stylesheets can reside anywhere at all. That means, for example, that you could host your custom Skin on a different server - even locally on your own computer [if set up as a web server or using a WebDAV connection to a server]. This is practical if, for example, you want to design your Skin with a software package - like a HTML/CSS editor. |
SkinDesigner: Presets |
• Preset 1: regular template. • Preset 2: spacier template. • Preset 3: narrow template with tabs • Preset 4: fullscreen template with tabs The "point-and-click" Editor is the same for all four; use it to create an unique style - and switch between the presets to see how it is applied. Your styling preferences is saved even should you select a different Skin Category - you can always come back to it later. You can also use this tool as a starting point for a CustomCSS Skin; at any time, you can retrieve the stylesheets it generates by going to this URL: ... Here you will find the output, and can copy it into your own stylesheet for further refinement. It is strongly recommended that you move your completed design into CustomCSS - it will make them future-proof [they become unaffected by future updates to the SkinDesigner]. |
Preferences, Tab 4 [ Advanced Options ] |
The Advanced Options Tab offers extensive customization alternatives for how your website will behave, as well as tools for including third-party content, widgets, metadata, etc. It is divided into four sections: Menus: customize headers and footers Content: customize how published content will behave and add extras Interactivity: settings for Guest Access, slideshows, RSS, mobile browsing and content filtering [context-sensitive publishing] Digital Signage: customize how Signs will work. See below for details on these options. |
Advanced Options: Menus |
Search will add either a Search Field or a link to an Advanced Search Form to your Top Menu. It can be configured to search specific containers. Breadcrumbs will generate a navigation strip just below the Top Menu. Homepage will add a Home link to the automatic Top Menu. Contact Form will add a Contact link to the automatic Top Menu. Only available if Allow Guests is enabled and a Guest Account is configured. |
Footer: global navigation links for the page footer. |
Widgets: activates the Footer Widgets for the Website and Digigal Signs respectively. There is also a "Sticky" option, which if checked, will pin Website Footer Widgets to the left edge of the visitor´s screen. |
Advanced Options: Content |
Inline Buttons turns print/calendar navigation / list navigation arrows On/Off. Dates insert Last Modified Date below all page titles. Bylines will insert the name of the document´s author below all page titles. Portal Header extends the Homepage with an extra content area below the Top Menu. When checked, an Edit button will appear. Click it to insert your content. The actual file can also be found by opening Ensemble > Services. Portal Footer extends the Homepage with an extra content area below the Newslist. When checked, an Edit button will appear. Click it to insert your content. The actual file can also be found by opening Ensemble > Services. |
Includes: checking these will enable add-on areas where you can insert third-party services, adverts, custom code or extra meta tags. These documents require XHTML code. When any of these fields are enabled, an Edit button will appear. Click it to insert your content. These files can also be found by opening Ensemble > Services.
|
Advanced Options: Interactivity |
Allow Guests: by providing an ID and password for a FirstClass Guest Account here, a Contact Form becomes available for the Top Menu. It will also faciitate anonymous access to the native Commenting Widget, as well as to FormBuilder Forms you can use to gather information or communicate with anonymous visitors. If you do not allow Guests, all such functions will throw a login prompt and the visitor must authenticate with a FirstClass account. Slides: select how fast automatic slideshows will run, and the height of your slideshows. If you insert an asterisk * before the height value, it will also work for Digital Signs; else, the Sign Slideshow height defaults to 500 px. Publish RSS will output the Newslist [all documents in the Content Folder] as a RSS stream. Contextual: when checked, objects in the Sidebar container will only be displayed if the first five character of the object name matches the name of the current web page. Use this to create unique sidebars for pages / groups of pages. Mobile UI customizes browsing with hand-held devices. When selected, a dialog appears where you can reroute handheld devices to a custom content folder of your choice. Else, handhelds will get the normal website content and FirstMagic will attempt to simplify it for the smaller screen. |
Advanced Options: Digital Signage |
Disposal method: what happens when a scrolling sign reaches the last item of the Event List.
Scroll speed: how fast the scrolling Event List is moving. Logo: choose a logo mode in the dropdown menu.
|
Preferences, Tab 5 [ Help ] |
Support Website: Visit us to post your questions and feature requests, browse the FAQs and get help. It´s free. Widget Library: Get more Widgets for your Website or Digital Signs! |