To configure a new website, login with the FirstClass Client and open the Site Root - it´s a container on your FirstClass Desktop. Then click Setup in your Site Root Tolbar.
To navigate the Setup Form, click the buttons to the left of each Panel title.
1: GIVE YOUR WEBSITE A NAME
Until you name the site, all pages will be titled "My Name Here", which isn´t very useful.
Click the Meta Tab and fill in the name of your organization - it´s the very first field there. The other fields there are useful, but not essential; they can be filled in at any time - read more about this in the Metadata section.
2: LICENSE THE SITE
If you subscribe to a Hosted Service the site is already licensed, but if you have installed FirstMagic yourself you will need a FirstMagic license to use it beyond the 30-day demo limit.
See the Where to purchase FirstMagic products chapter in this guide to locate your nearest FirstMagic Reseller, or visit this page for a list: http://www.webtrait.com/sales
The License panel is hidden if the site is already licensed; if not, it is the default panel. To get to the License panel if a license already exist, tab out of the active panel simply by clicking it´s own button.
There are two licensing fields: the left is for FirstMagic, the right for FirstMagic Pro. Sites will work without a Pro code but not without the basic license. When you add a new code, click the padlock to the right of it to lock it and make Site Setup the Start panel.
Should the demo time out before you have time to purchase a license, the Activation Code will reactivate it. It will also remove the "Demo" badge in the footer.
3: SITE SETUP
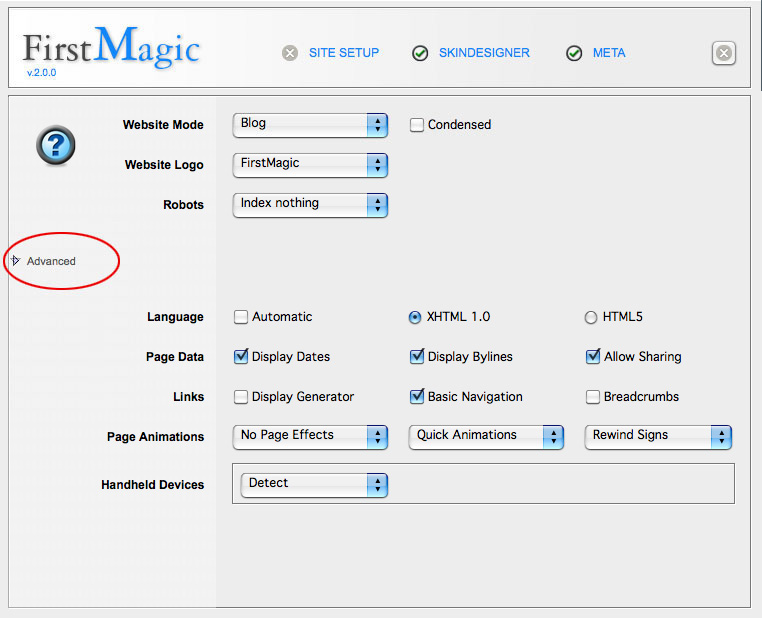
Most websites are ready to use as is, without any need for advanced configuration - but the three visible options are important:
- Website Mode defines the kind of website you want to publish.
- Website Logo is the site header.
- Robots tells search engines what you want them to do for your site.
Website Mode
Homepage makes your website´s Start Page into one single Homepage. This is a document that can be filled with rich text, images and slideshows. It has three different options:
- Default: as a normal web page.
- Login: visitors can log in to a personal Homepage that displays any Project Containers that they are subscribed to.
- Splash Screen: The Homepage document becomes an introduction to the Portal Container - with a forwarding button. The Portal container will work like a blog. You can disable the stylesheet for Splash Screen content by toggling the tiny pencil icon.
Blog will skip the Homepage document entirely: the Portal container becomes the Homepage, and will behave like a blog. It has two options: normal and condensed. Condensed means the blog will only display the first paragraph of each posting, plus a "more"-link.
Tiles is a media layout: it will display the Portal container in a grid, with previews of what´s inside each tile. It is similar to the Blog Mode exept that it will display everything - containers, movies, images, text files, etc. [Blog Mode only displays blog posts].
The Tiles Mode has an "Expanded" option that will suppress the Sidebar to make full use of the entire Homepage.
Website Logo
Your website´s Header - link up an image you want to use, and upload it to the Library container [it´s what it is for].
Robots
Tell Google and other search engines how you want your website indexed.
- The Description field: a short sentence describing your website.
- The Keywords field: a list of comma-separated keywords you want to associate your site with. Do not use more than 8-10 words, or Google will treat it as spam.
 The Advanced fields
Language:
If Automatic is checked, visitors will get all website terms in their own language. If unchecked, all terms are retrieved from terms.inc - an editable text file in /Library/HTML/ - instead.
You can publish the site as XHTML 1.0, or as HTML5. Use XHTML if you are going to use the traditional FirstClass Client. Use HTML5 if you are going to use FCWS.
In doubt? Your pages will always work either way, though If you edit something with the "wrong" client, that particular page might not validate to W3C standards.
Page Data:
- Display Dates: will put a Last Modified date/time stamp on all pages.
- Display Bylines: will put the author´s name on all pages.
- Allow Sharing: will add RSS and Embed buttons to all media pages [blogs, podcasts, image galleries etc]. In image galleries, this will also enable Exif output.
Links:
- Display Generator: adds a link to FirstMagic in the Footer.
- Basic Navigation: adds Home, Print and SiteMap links to your Menus/Footers.
- Breadcrumbs: adds a breadcrumb path to all pages.
- Page Animations: page transition effecta
Handheld Devices:
- Ignore: handhelds will get the regular website.
- Detect: handhelds gets an option to switch to a simplified layout.
- Forward to...: handhelds are directed to a specific container. Use a relative URL in the Forward field: /mypath/tothisfolder/
 4: SKINDESIGNER
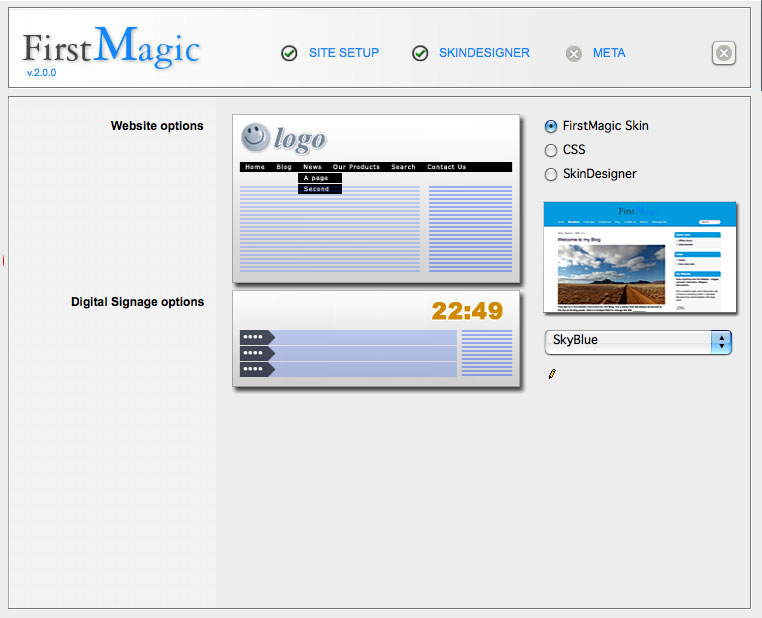
The visual appearance of your site: switch between FirstMagic Skins, CSS, and the SkinDesigner sections with the radio buttons on the upper right.
- To move the logo around, click on it
- To turn the Top Menu on and off, click below the logo
- To move the sidebar, click on it
- To change the time format, click the clock
The SkinDesigner Modes:
The SkinDesigner has four presets, but If you are a developer, you might want to choose CSS: it will let you write a custom stylesheet from scratch instead.
The presets are for making a point-and-click design. The end result of this is a stylesheet too, but you won´t have to write it: FirstMagic does it for you in realtime, so you can see results on the website immediately.
The CSS field is where you can write in the URL to your stylesheet. This can go anywhere you like - but the default is local to the website: /Library/html/FMskin.css. You will find a commented example to use as a jump-off point on that path.
The Presets brings up a styling dialog. It works the same for all four, but the layout of each preset is different. This tool allows you to define fonts, sizes, borders, colors and backgrounds for your site:
1: Click the "Font family", "Font Size", "borders/lines" and "Link" titles
to select fonts and sizes. Click the titles, not the previews below.
2: Click the previews to bring up a color picker.
3: Left: click to choose square or rounded borders.
Right: click to turn drop shadows on/off for borders.
4: Click the background area to select how backgrounds
will appear [gradient, flat, or transparent].
5: Click the arrow to choose a color for this background.
5: METADATA
Metadata for your website. You will want to put in a title or name in the Site Owner field [it becomes the Browser Window title], but the rest is optional.
If filled in, Contact Info fields are used by various widgets and in Print Layout headers. The Website Signature field is a short line of text in your website footer if filled in - a copyright notice, for example.
Click Advanced for more meta fields:
- Google Translate: if you use the Google Translate Widget, or install Google´s translator services via some other method, put the Translator´s Meta ID tag here.
- Statistics: paste the code for any statistics package here to activate it for all your pages.
- Open Graph: connect your site to Facebook by filling in a Facebook User ID or App ID here. You can fill in more IDs by comma-separating them.